All gun owners should be proficient in the different shooting stances available to them. Each stance provides a different level of stability and accuracy, so it's important to find which stance works best for you and practice with it often. In this blog post, we will discuss the four most common shooting stances pistol owners use and how to effectively use each one.
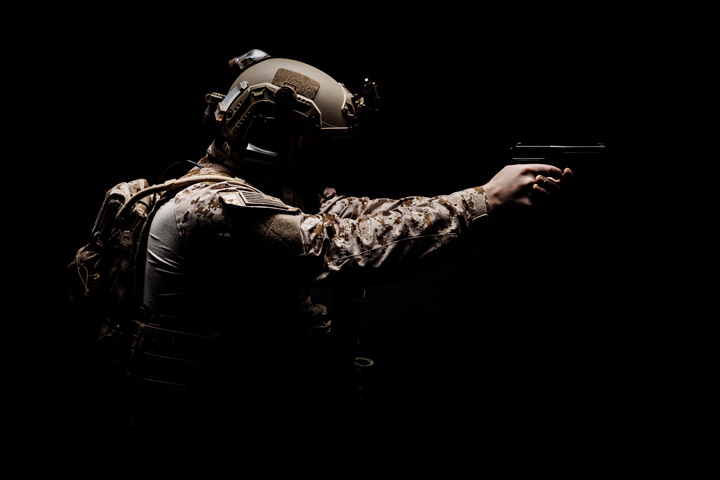
TABLE OF CONTENTS
Why do we need good shooting stances?
A shooting stance is a position in which a shooter stands to take aim. The more accurate your stance is, the stronger foundation you lay for any other shooting fundamentals.
Having a proper shooting stance is important because it provides a strong foundation, helps you remain stable while firing, and allows you to take accurate shots. A good shooting stance will help you control your firearm, minimize recoil, and make follow-up shots easier. There are a variety of different shooting stances that you can use, and each has its own advantages and disadvantages. Ultimately, the best shooting stance for you is the one that allows you to hit your target consistently.
Not-to-do’s when choosing stances
As we know, in this blog, there are various options for you to choose from. However, some reminders need listing before you head to the main part:
Freestyling is a big NO
When handling a firearm, it is important to always be aware of your stance. No matter how experienced you are, it is never a good idea to simply pick up a gun and stand however you want. The way you position yourself can have a significant impact on your accuracy and safety. For instance, if you are free-styling your stance, it is more likely that you will unwittingly point the gun in an unsafe direction. In contrast, adopting a proper shooting stance will help you to maintain control of the weapon and stay on target.
Avoid limp-wristing your gun
Limp-wristing is another shooting stance mistake you should avoid. This happens when you grip the gun too loosely, causing it to wobble in your hand. This can lead to inaccurate shooting and even dangerous misfires as the gun recoils upward after shooting. To maintain a firm grip on the gun, make sure to hold it with your strong hand and keep your wrist straight.
Now, we are ready to jump into the main section.
The best shooting stances
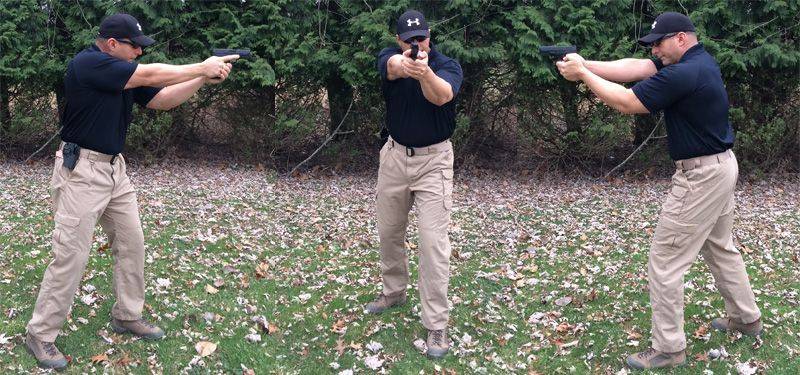
Isosceles Stance
As it is easy to conduct this position, many people opt for it as the most common pistol shooting posture.

1. Description
An isosceles shooting stance gets its name from the triangular shape created by the arms and shoulders when assuming the position from above.
To get into an isosceles shooting stance, simply extend your arms straight out in front of you so that they are parallel to the ground. Hold the gun forward while your arms and broad open shoulders form a triangle. Next, place your feet shoulder-width apart and point them forward. Make sure that you bend your knees slightly, and have a slight lean at the waist forward. You can then adjust your grip on the gun to find a comfortable and secure hold.
2. Pros
- Strong support and wide vision: One advantage of this shooting stance is that it provides a wide base of support and wide peripheral vision regardless of the dominant-vision eye, making it difficult to knock over. This makes it ideal for situations where you may need to shoot quickly or defend yourself against an attacker coming from different directions.
- An easy and comfortable stance: This position naturally puts the shoulders and hips in alignment, which makes it easier to maintain a consistent shooting grip and mount the gun in a repeatable manner. From this stance, you aim straightforwardly at the target. It is also easier to make small adjustments to your aim. The isosceles stance provides a more stable platform from which to shoot, making it ideal for novice shooters or those who are shooting at long range. One fact is that lots of people choose this stance in shooting competitions.
- Extra protection if wearing armor: In a traditional shooting stance, the body is positioned at an angle to the target, with the shoulders and hips squared. This stance gives the shooter a good deal of mobility, but it also leaves a large portion of the body exposed. Wearing body armor can help to mitigate this exposure, it minimizes the area that is exposed, and it also makes it more likely that the armor will deflect a bullet. As a result, shooters who are adopting an isosceles stance when firing their weapon always wear body armor.
3. Cons
- Loss of balance if pushed from behind/front: The drawback of an isosceles stance is that it can potentially make you less stable if you are pushed forward or backward. This is because your center of gravity is in the middle of your feet, rather than in the back like it is in a boxer's stance. This makes it easier for your opponent to push you off balance from your back or right from the front direction.
But, we have a solution for this. By bending down your knees and leaning forward a little, you can minimize the problem already. Also, this posture is still stable despite any effects taken from the sides. - Large exposure toward the target: As you stand still, combating face-to-face with the target, the attacker has a bigger chance to aim at you with his shot. Still, if you ensure to wear body armor, the body and organs are sure to be covered.
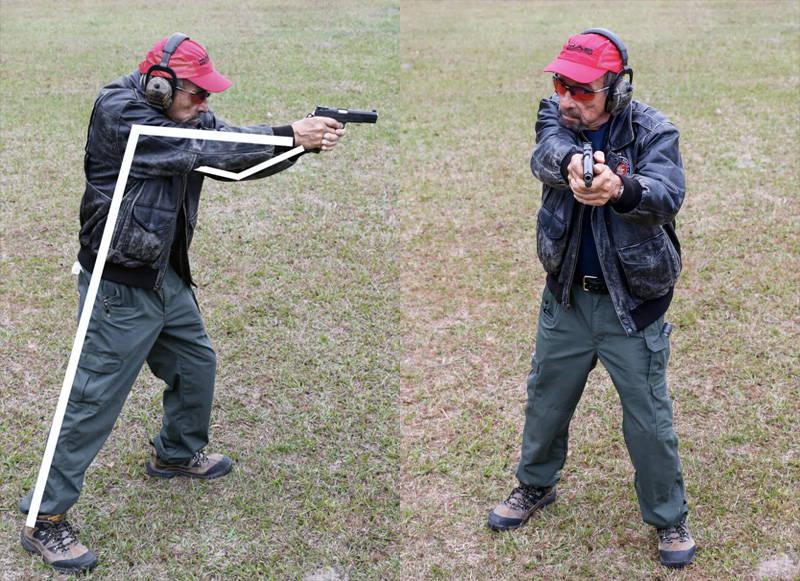
Weaver Stance
1. Description
The Weaver stance is named after Jack Weaver, who designed it for competitive shooting in the 1950s. Here is how to conduct this:
The Weaver stance is similar to the Isosceles stance, except that the feet are not shoulder-width apart. Instead, the shooting-side foot is moved back and the support foot is moved forward, set your feet about 18 inches apart with your shooting foot slightly behind and to the side of your support foot. Exert more of your weight on your front leg. This slight offset gives you a more stable platform from which to shoot and makes it easier to transfer your weight from one foot to the other if necessary.
Keep your shooting arm straight but not locked at the elbow as you stretch it forward. Then, straighten the elbow of your support arm. After that, using your shooting hand, press forward while pulling back with your support hand. The push-pull tension caused by this action will aid in increasing your weapon control.
The Weaver stance also has a different grip on the gun. The shooting hand is placed high on the backstrap of the gun, while the support hand is placed low on the grip. This gives you more control over recoil.
2. Pros
- Good for rapid-fire: Thanks to its wide base, the Weaver stance helps to keep your body in alignment so that you can make rapid-fire shots without losing your aim. By keeping your body firmly planted, you can maintain your aim even when firing multiple rounds in quick succession. In addition, the Weaver stance helps to distribute the weight of the gun evenly between both arms, reducing fatigue and increasing accuracy.
- Less recoil: The low placement of the support hand helps to reduce felt recoil by keeping the gun closer to your center of gravity. Also, thanks to the push-pull method, you can gain better recoil management while having this stance.
- Body bladed: As your shooting-side shoulder is moved forward, it helps to protect your vitals by placing them behind the bicep of your shooting arm. This movement is also known as "blading" your body making it a smaller target and less likely to be hit in a firefight.
3. Cons
- Shoulder fatigue: The Weaver stance can put a lot of strain on the shooting-side shoulder if you are not used to it. This is because you are constantly fighting against the natural tendency of the gun to recoil by using the push-pull method.
- Less mobility: The Weaver stance is not as mobile as some other shooting stances because of its offset foot placement. This can make it more difficult to move and shoot at the same time, especially for the non-dominant side of your body.
- More challenging for the cross-dominant shooters: The Weaver stance can be more challenging for those who are "cross-dominant" shooters. This means that they have a dominant hand that is different from their dominant eye. For example, a right-handed shooter who is left-eye dominant will find it more difficult to shoot in the Weaver stance because their non-dominant eye will be looking down the sights of the gun instead of their dominant eye.
- Side body exposed: The Weaver stance can leave your side body more exposed to an attacker than some other shooting stances, even when you have prepared with armor, the side body is usually not covered.
Chapman Stance (modified Weaver Stance)
1. Description
The Chapman stance is a modified version of the Weaver stance that was developed by Ray Chapman in the 1970s. The main difference between the two stances is that the Chapman stance has a narrower foot placement.
To conduct this shooting stance, start with your feet about 12 inches apart instead of 18 inches like in the Weaver stance.
From there, follow the same instructions as the Weaver posture above. The only two exceptions are:
You will not be offsetting your shooting-side foot behind your support-side foot like in the Weaver stance. This makes the Chapman stance a little more balanced and mobile than the Weaver stance.
The shooting arm is fully extended and fully locked out with the support arm bent at the elbow downwards. This gives you a little more stability and control over recoil.
2. Pros
This has all of the Weaver stance's benefits, and the following, too:
- Extended good recoil control: The Chapman stance gives you a little more control over recoil because of the shooting arm's position. It is fully extended and locked out at the elbow, which gives you more leverage to manage the gun's natural tendency to recoil.
- More balanced: The Chapman stance is a little more balanced than the Weaver stance because of its narrower foot placement. This makes it easier to move and shoot at the same time without losing your balance.
- Good for cross-dominant shooters: The Chapman stance can be easier for those who are "cross-dominant" shooters thanks to the cheek-weld technique, which helps to align the non-dominant eye with the sights of the gun.
3. Cons
Similar to the pros, Chapman has all of Weaver's weaknesses, EXCEPT for the cross-dominant shooting.
- Less mobility: The Weaver stance is not as mobile as some other shooting stances because of its offset foot placement. This can make it more difficult to move and shoot at the same time, especially for the non-dominant side of your body.
- Shoulder fatigue: The Weaver stance can put a lot of strain on the shooting-side shoulder if you are not used to it. This is because you are constantly fighting against the natural tendency of the gun to recoil by using the push-pull method.
- Another disadvantage of this:
- Strained neck muscles: The Chapman stance can put a lot of strain on the neck muscles because of the shooting arm's position. It is fully extended and locked out at the elbow, which can cause the shoulder to drop down and forward, putting strain on the neck muscles.
Fighting Stance

1. Description
The fighting stance is a shooting stance that is designed for close-quarters combat (CQC).
Remain square to the target, and set your shooting-side foot approximately eight inches behind you, your feet shouldn't be as wide apart as they would be in Weaver, but just enough so that you can put some weight on your front foot and feel solid. Both of your feet should be pointed forward, although it's okay if the toe of your back foot bends out slightly. You don't want to shave the target. Maintain flexibility by keeping your knees slightly bent, not locked.
Then, stretch your strong arm and bend your support arm to generate the push-pull tension, like doing with Isosceles.
2. Pros
This posture is quick to learn and provides outstanding body balance Weaver while preserving the recoil control of Isosceles' straight arms. It's also rather simple to move around and pivot as needed.
Here's a small tip: These holsters will support your shooting stance as its best & allow you to draw your weapons as quickly as possible!
Are you having fun reading with Dinosaurized? Here's a little gift for better shopping experience~ Enter this 15% Discount code: "GundiscussionD15" at Checkout now~
Shooting stances with defense assurance
Power Point
The Power Point shooting stance is a shooting stance that was developed by Massad Ayoob. In close-quarters combat, there can be times when both hands aren't available. The Power Point Stance provides the capability to elaborate fast and accurate close-up fire with either the dominant or non-dominant hand. This stance also allows for maximum maneuverability, as well as the ability to quickly transition from one target to another. While the Power Point Stance may not be suitable for long-range shooting, it is an essential tool for close-quarters combat.
This is a much more forceful one-handed position that bullseye competitors utilize. The gun-side foot moves forward 15 to 20 inches with either hand, with the shoulder pressing into the gun and the knees contracted. It's similar to a boxer delivering a powerful strike. You aim the gun at your target.
If feasible, the non-shooting hand should be tucked close to the center of the chest. According to Massad Ayoob, the palm of that hand should be pointing upward with the fist clenched. This helps to strengthen the upper shoulder muscles and improves trigger control. It provides the most precise stance, but if the non-shooting hand is busy or wounded, the forceful "punch the target" will still offer speed and accuracy.
Strong hand Retention
If you find yourself in a situation where you might be face-to-face with an attacker, it is important to be aware of your surroundings and have a plan of action. One way to protect yourself is to adopt the Strong-Hand Retention stance, instead of leading with your gun. This involves holding the gun in your strong hand and keeping it close to your body so that attackers will have a difficult time getting to it. Additionally, this stance allows you to keep your support hand free, which can be used to defend yourself if necessary. The Strong-Hand Retention stance is an effective way to protect yourself in close quarters and can help you stay safe in a potentially dangerous situation.
The gun-arm elbow is rolled up securely into the side of the body, with the gun hand a few inches forward of the stomach and pointing straight ahead. The support hand moves to shoulder height to clear the barrel and gives a free hand to fight against an unexpected attack. This position secures the pistol to the body while allowing the support hand to function freely. With this posture, foot location is irrelevant. They can travel wherever they want as long as the pistol is snugly tucked within the body, making it impossible to seize.
If a threat appears unexpectedly, all that is required is a pivot of the upper body to bring the gun to point and shoot. If dangers appear at a greater distance, the gun is already in hand, the support hand is prepared to move, and any of the previous positions may be rapidly switched into.
However
This position has a huge disadvantage: gases and unburned powder particles will blast right up and expose your complexion, including vulnerable parts like the face and eyes. At a minimum, it's distracting, and at worst, it's incapacitating. You cannot afford to be distracted or crippled in a self-defense scenario, thus it is critical to be aware of this possible threat.
Conclusion
As a responsible gun owner, it is important to be aware of the best shooting stances and how to properly use them. Improper stance can lead to inaccuracy and even injury. The stances we’ve covered are all effective for different reasons, so it is important to understand the pros and cons of each before choosing one for your needs. Remember, safety should always be your number one concern when handling firearms.
Be flexible!
The best shooting stance is the one that works best for you. Everyone embraces their features differently, and what works for one may not work for others. It's important to experiment with different shooting stances and find the one that feels most comfortable and natural for you. Additionally, it's important to be flexible and adaptable, as different situations will call for different shooting stances. By being aware of the various shooting stances available, you can be prepared for any situation.
Source: Special thanks & Image Credits to Police1 and The Amory Life
Are you having fun reading with Dinosaurized? Here's a little gift for better shopping experience~ Enter this 15% Discount code: "GundiscussionD15" at Checkout now~